Amazon EC2インスタンスはデフォルトではSSL(HTTPS)の設定がされていないため、通常はHTTPでの接続になります。しかし、適切な設定を行うことで、EC2インスタンスをHTTPS(SSL)対応にすることができます。
今回はEC2単体でApacheを用いてSSL(https)化して、そのサーバでWordPressをホストする手順を紹介します。
- EC2単体でSSL化する
- Apacheを使用
- ELBやCloudFrontは使用しない
- ssl証明書は無料の証明書Let’s Encryptを使用する
- 注意: EC2ではACMが使用できません。
ちなみにNgnixでもSSL化が可能です。NgnixでのSSL化の手順は以下の記事で紹介しています。
前提条件
- AWSアカウントは保有している
- EC2はAmazon Linux 2023を使用する。
- Route53でドメインを購入済み
Apacheを使ったSSL設定手順
手順1: EC2を起動する
マネジメントコンソールからEC2を起動します。AMIは2024年7月時点で最新の[Amazon Linux 2023]を利用していますが、何でもいいかもしれません。
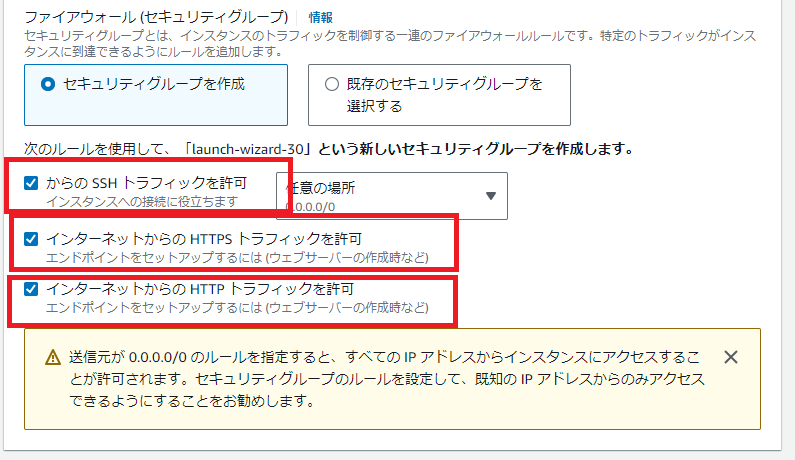
キーペアなしのデフォルトで問題ありませんが、SSH(22)とHTTP(80)とHTTPS(443)の通信は許可しておきます。
手順2: Apacheのインストールと設定
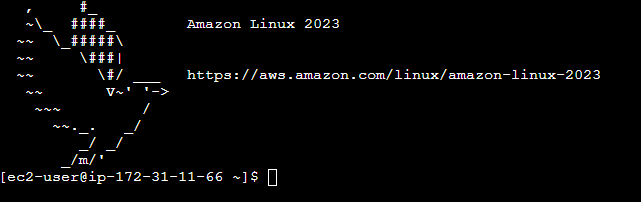
インスタンスコネクトでEC2にSSH接続します。EC2インスタンスの一覧画面から「接続」を押下することで接続可能です。TeraTermなどを使用してもよいですが、その場合はキーペアが必要です。

以下のコマンドを打ってApacheをインストールします。成功するとComplete!と表示されます。
sudo yum install httpd -yインストールされたら以下のコマンドで起動します。このコマンドは実行しても何も表示されません。
sudo systemctl start httpd以下のコマンドでApacheの自動起動を設定しておくと、EC2が再起動されたときに便利です。
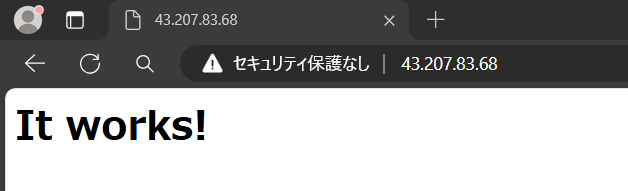
sudo systemctl enable httpd.serviceこれでApacheの設定は完了したのでブラウザーでhttp://[EC2のIPアドレス]にアクセスするとIt works!と表示されます。この時点ではSSL化していないため「セキュリティ保護なし」の警告が出ます。
手順3: Route53でドメイン→EC2のAレコードを作成しておく
Route53でのドメインの購入とホストゾーンの作成は済んでいるものとします。
設定するドメインをEC2のグローバルIPに向けるAレコードを作成してください。
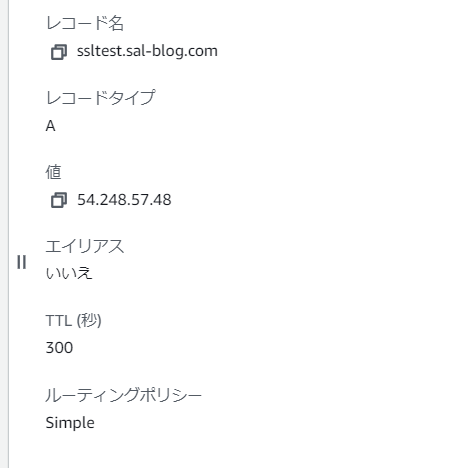
私は当ブログのサブドメインを登録して再現しています。また、ここでEIPを使用していない場合、EC2が停止、起動するたびにアドレスが変わるのでレコードの設定を変える必要があります。
長期間運用する場合、EIPを設定しておくと便利です。
手順4: SSL証明書を作成する
HTTPS接続を実現するための証明書の払い出しを行います。今回は無料で使えるLet’s Encryptを使用します。
Let’s Encryptは、非営利団体の Internet Security Research Group (ISRG) が提供する自動化されたフリーでオープンな認証局です。
https://letsencrypt.org/ja/
AWSでSSL証明書と言えばACM(AWS Certificate Manager)がありますが、EC2ではACMは使えません。理由は秘密鍵をApache(EC2)に設定できないからです。
EC2 インスタンスでホストされているウェブサイトに Amazon 発行の ACM パブリック証明書を設定するには、証明書をエクスポートする必要があります。ただし、証明書に署名して作成する秘密鍵は ACM が管理するため、証明書をエクスポートすることはできません。
https://repost.aws/ja/knowledge-center/configure-acm-certificates-ec2
以下のコマンドでcertbotをインストールします。成功するとComplete!となるはずです。
sudo yum -y install certbot以下のコマンドを実行して証明書を発行します。コマンド入力後は更新のお知らせなどが届くメールアドレスの入力、規約の同意、メール送付の同意がありますので入力してください。
sudo certbot certonly --webroot -w /var/www/html -d [ドメイン名]成功すると以下のように証明書が払い出されたことが通知されます。証明書の有効期限は3ヶ月ですが、certbotが自動的に更新する旨が記載されています。
その中に証明書とキーの保存場所が出力されているのでメモしておきましょう。(2~3行目)
Successfully received certificate.
Certificate is saved at: /etc/letsencrypt/live/[ドメイン名]/fullchain.pem
Key is saved at:         /etc/letsencrypt/live/[ドメイン名]/privkey.pem
This certificate expires on 2024-10-15.
These files will be updated when the certificate renews.
Certbot has set up a scheduled task to automatically renew this certificate in the background.
手順5: ApacheでSSLの設定を行う
ApacheのSSL化のモジュールを以下コマンドでインストールします。
sudo yum install mod_ssl -yインストールすると/etc/httpd/conf.d配下にssl.confが生成されます。以下のコマンドでssl.confを編集します。
sudo vi /etc/httpd/conf.d/ssl.confファイルの中盤にSSLCertificateFileとSSLCertificateKeyFileの記述があるので手順4で作成した証明書のパスに変更して保存します。
#   Point SSLCertificateFile at a PEM encoded certificate.  If
#   the certificate is encrypted, then you will be prompted for a
#   pass phrase.  Note that restarting httpd will prompt again.  Keep
#   in mind that if you have both an RSA and a DSA certificate you
#   can configure both in parallel (to also allow the use of DSA
#   ciphers, etc.)
#   Some ECC cipher suites (http://www.ietf.org/rfc/rfc4492.txt)
#   require an ECC certificate which can also be configured in
#   parallel.
SSLCertificateFile /etc/letsencrypt/live/[ドメイン名]/fullchain.pem

#   Server Private Key:
#   If the key is not combined with the certificate, use this
#   directive to point at the key file.  Keep in mind that if
#   you've both a RSA and a DSA private key you can configure
#   both in parallel (to also allow the use of DSA ciphers, etc.)
#   ECC keys, when in use, can also be configured in parallel
SSLCertificateKeyFile /etc/letsencrypt/live/[ドメイン名]/privkey.pem
そののちに設定を反映するためにapacheを再起動します。
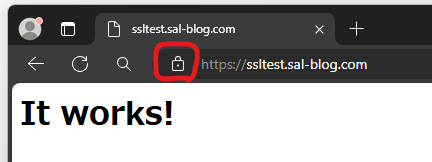
sudo systemctl restart httpdこれでhttps://[ドメイン]をブラウザで表示すると晴れてSSL接続できました。
接続確認できた後はEC2のセキュリティグループで80番ポートを閉じておくとセキュアになります。
WordPressの設定手順
手順1: phpの設定
以下のコマンドでphpと関連パッケージをインストールします。成功するとComplete!となるはずです。
sudo yum install php-cli php-pdo php-fpm php-mysqlnd php-xml php-mbstring php-gd -y手順2: DBのインストール
以下のコマンドでmariadbと関連パッケージをインストールします。成功するとComplete!となるはずです。
sudo yum install mariadb105-server -yインストールしたmariadbを起動します。
sudo systemctl start mariadbmariadbを自動的に起動するようにしておくと便利です。
sudo systemctl enable mariadb手順3: DBの設定を行う
以下のコマンドでmariadbの初期設定を行います。
sudo mysql_secure_installationコマンド入力後、以下のようにいろいろ質問されるので解答していきます。
[ec2-user@ip-172-31-33-207 ~]$ sudo mysql_secure_installation

NOTE: RUNNING ALL PARTS OF THIS SCRIPT IS RECOMMENDED FOR ALL MariaDB
      SERVERS IN PRODUCTION USE!  PLEASE READ EACH STEP CAREFULLY!

In order to log into MariaDB to secure it, we'll need the current
password for the root user. If you've just installed MariaDB, and
haven't set the root password yet, you should just press enter here.

Enter current password for root (enter for none):
OK, successfully used password, moving on...

Setting the root password or using the unix_socket ensures that nobody
can log into the MariaDB root user without the proper authorisation.

You already have your root account protected, so you can safely answer 'n'.

Switch to unix_socket authentication [Y/n] Y
Enabled successfully!
Reloading privilege tables..
 ... Success!


You already have your root account protected, so you can safely answer 'n'.

Change the root password? [Y/n] Y
New password: [決めたパスワードを入力(入力しても表示されません)]
Re-enter new password: [決めたパスワードを入力(入力しても表示されません)]
Password updated successfully!
Reloading privilege tables..
 ... Success!


By default, a MariaDB installation has an anonymous user, allowing anyone
to log into MariaDB without having to have a user account created for
them.  This is intended only for testing, and to make the installation
go a bit smoother.  You should remove them before moving into a
production environment.

Remove anonymous users? [Y/n] Y
 ... Success!

Normally, root should only be allowed to connect from 'localhost'.  This
ensures that someone cannot guess at the root password from the network.

Disallow root login remotely? [Y/n] Y
 ... Success!

By default, MariaDB comes with a database named 'test' that anyone can
access.  This is also intended only for testing, and should be removed
before moving into a production environment.

Remove test database and access to it? [Y/n] Y
 - Dropping test database...
 ... Success!
 - Removing privileges on test database...
 ... Success!

Reloading the privilege tables will ensure that all changes made so far
will take effect immediately.

Reload privilege tables now? [Y/n] Y
 ... Success!

Cleaning up...

All done!  If you've completed all of the above steps, your MariaDB
installation should now be secure.

Thanks for using MariaDB!
WordPress用にDBのセットアップを行います。以下コマンドを実行してDBにログインします。パスワードを確認されるので先ほど設定したパスワードを入力します。
mysql -u root -p以下のように表示されれば成功です。
[ec2-user@ip-172-31-33-207 ~]$ mysql -u root -p
Enter password:
Welcome to the MariaDB monitor.  Commands end with ; or \g.
Your MariaDB connection id is 13
Server version: 10.5.23-MariaDB MariaDB Server

Copyright (c) 2000, 2018, Oracle, MariaDB Corporation Ab and others.

Type 'help;' or '\h' for help. Type '\c' to clear the current input statement.

MariaDB [(none)]>
ここからはSQLを入力してDBのセットアップを行っていきます。
以下を入力してDBにwordpress-userを作成します。my_passwordの箇所は自分で考えたパスワードに置き換えます。
上で作成したrootのパスワードとは別のものを設定できます。
CREATE USER 'wordpress-user'@'localhost' IDENTIFIED BY 'my_password';Query OKと表示されれば成功です。ここで設定したパスワードは後程使うので覚えておいてください。
続いて以下コマンドでDBを作成します。
CREATE DATABASE `wordpress-db`;先ほど作成したユーザwordpress-userに作成したDBの権限を割り当てます。
GRANT ALL PRIVILEGES ON `wordpress-db`.* TO "wordpress-user"@"localhost";変更を有効にするためにフラッシュします。
FLUSH PRIVILEGES;データベースの設定は以上なのでexitでログアウトします。
exitデータベースの設定は以上です。
手順4: WordPressをインストールする SSH編
引き続きSSHで作業します。以下のコマンドでWordPressをダウウンロードして解凍します。
wget https://wordpress.org/latest.tar.gz
tar -xzvf latest.tar.gz
lsコマンドを実行するとダウンロードされたgzファイルと展開されたファイルが確認できます。
[ec2-user@ip-172-31-37-113 ~]$ ls
latest.tar.gz  wordpress
解凍されたフォルダwordpressの中にあるwp-config-sample.phpをwp-config.phpとしてコピーします。
cp wordpress/wp-config-sample.php wordpress/wp-config.phpコピーしたwp-config.phpを編集します。viを使って開きます。
vi wordpress/wp-config.phpいろいろ書かれたphpファイルが開かれます。冒頭にある下記記載を書き換えます。
database_name_here→wordpress-db
username_here→wordpress-user
password_here→my_password ※設定したwordpress-userのパスワード
/** The name of the database for WordPress */
define( 'DB_NAME', 'database_name_here' );

/** Database username */
define( 'DB_USER', 'username_here' );

/** Database password */
define( 'DB_PASSWORD', 'password_here' );
viエディタでは開いた直後は観覧モードになっています。
iを入力すると編集モードになります。
編集が終わったらEscキーを押して:wq Enterで保存できます。
viを閉じたらwordpressのファイルを/var/www/html/にコピーします。
sudo cp -r wordpress/* /var/www/html//home/ec2-user配下のファイルはもう使用しないので削除しておきます。
rm -r ./*httpd.conf ファイルを修正します。再度viエディタを使用します。編集方法は上をご覧ください。
sudo vi /etc/httpd/conf/httpd.conf<Directory “/var/www/html”>が記載されているセクションを見つけます。筆者の環境では131行目にありました。
このセクションのAllowOverride Noneの記載をAllowOverride Allに変更します。
このファイルには複数の AllowOverride 行がありますので修正箇所をお間違えないようにお願いします。
<Directory "/var/www/html">
    #
    # Possible values for the Options directive are "None", "All",
    # or any combination of:
    #   Indexes Includes FollowSymLinks SymLinksifOwnerMatch ExecCGI MultiViews
    #
    # Note that "MultiViews" must be named *explicitly* --- "Options All"
    # doesn't give it to you.
    #
    # The Options directive is both complicated and important.  Please see
    # http://httpd.apache.org/docs/2.4/mod/core.html#options
    # for more information.
    #
    Options Indexes FollowSymLinks

    #
    # AllowOverride controls what directives may be placed in .htaccess files.
    # It can be "All", "None", or any combination of the keywords:
    #   Options FileInfo AuthConfig Limit
    #
    AllowOverride All

    #
    # Controls who can get stuff from this server.
    #
    Require all granted
</Directory>
Apacheが/var/www/に書き込めるようにするために権限の設定を行います。
sudo chown -R apache /var/www
sudo chgrp -R apache /var/www
sudo chmod 2775 /var/www
find /var/www -type d -exec sudo chmod 2775 {} \;
その後Apacheを再起動して設定を反映させます。
sudo systemctl restart httpd手順5: WordPressをインストールする ブラウザ編
ここからはSSHは使用しません。
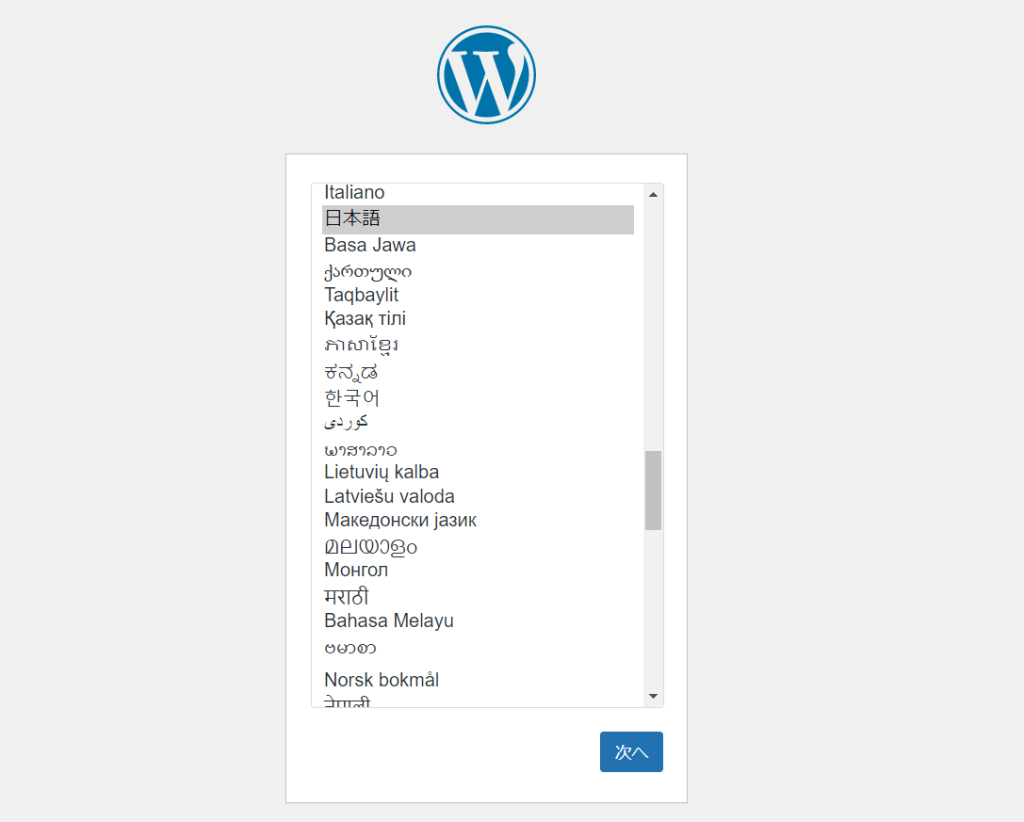
ブラウザを使用してEC2にアクセスします。Chrome、Edge、Firefox何でもよいので以下urlを入力してアクセスします。
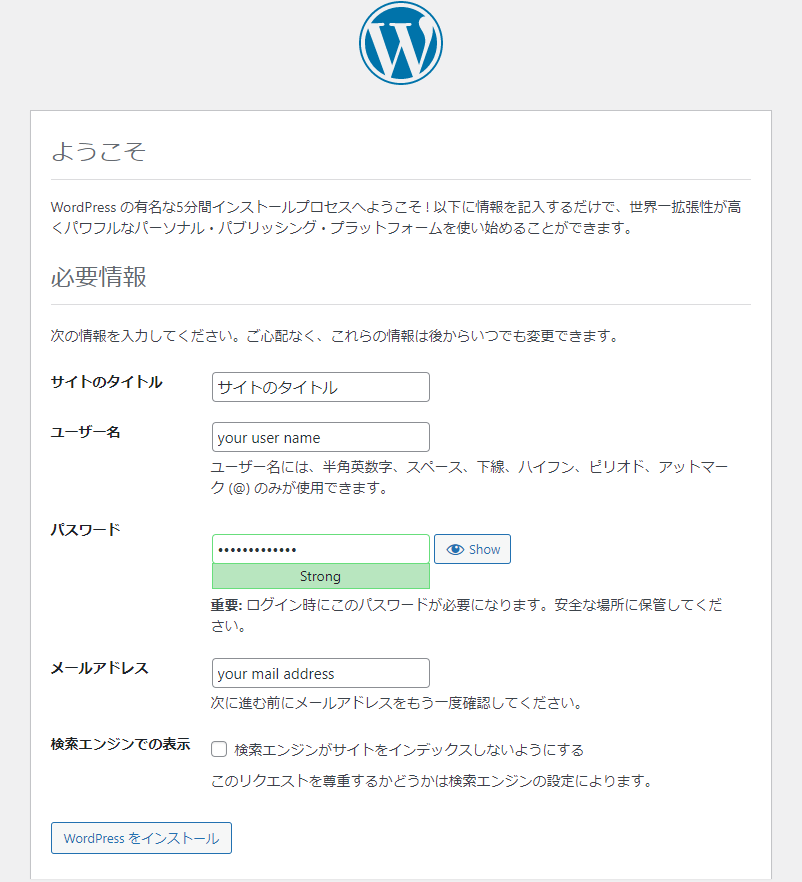
https://[ドメイン名]/wp-admin/install.phpするとこのような画面が表示されます。日本語があるので選択します。選択して次へを選択します。
次の画面ではいくつかの設定を入力します。あとから変更できるので自由に入力します。入力が完了したらWordPressをインストールを選択してください。
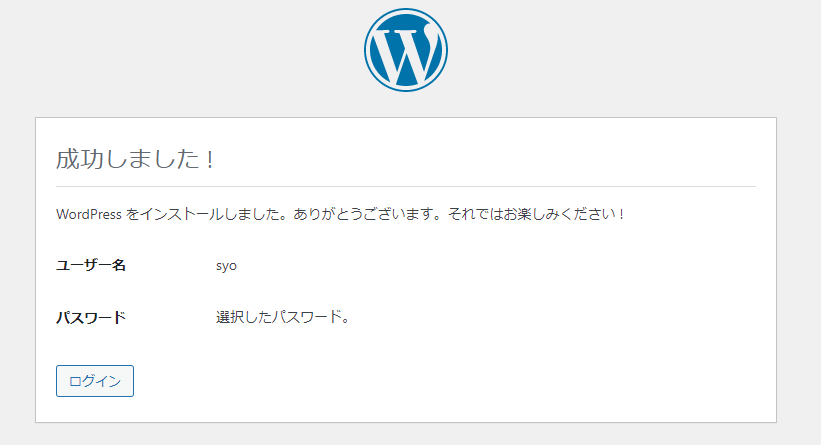
インストールはすぐに完了します。完了するとログインボタンが表示されるのでログインします。
ログインするとWordPressの管理画面にログインできました。https://でコンソールにアクセスできました。
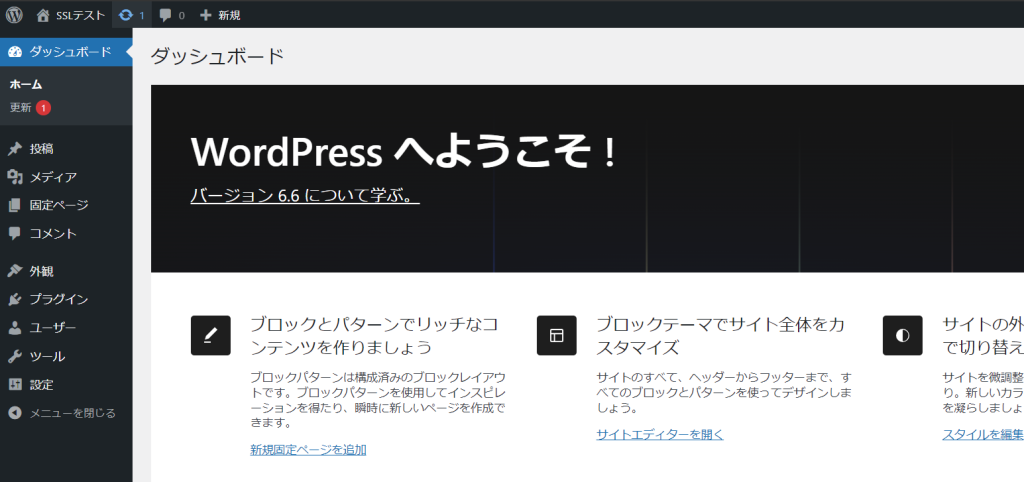
以下のアドレスにアクセスすると、SSL(HTTPS)でホストされているサイトにアクセスできました。
https://[ドメイン名]
まとめ
この記事では、Amazon EC2を使用してApacheでSSL化し、WordPressをホストする手順を詳しく説明しました。以下のポイントを押さえておけば、初心者でもスムーズに設定を完了することができます。
-
EC2インスタンスの起動と設定:
- Amazon Linux 2023を使用し、SSH、HTTP、HTTPSの通信を許可。
- Apacheのインストールと設定。
-
SSL証明書の設定:
- Let’s Encryptを使用して無料でSSL証明書を取得。
- ApacheにSSL証明書を適用してHTTPS化。
-
WordPressのインストールと設定:
- PHPおよび関連パッケージのインストール。
- MariaDBのインストールと初期設定。
- WordPressのダウンロード、設定ファイルの編集、Apacheの設定変更。
ぜひ参考にしていただき、実践してみてください。
以上です。
この記事がお役に立ちましたら、コーヒー1杯分(300円)の応援をいただけると嬉しいです。いただいた支援は、より良い記事作成のための時間確保や情報収集に活用させていただきます。

システムエンジニア
AWSを中心としたクラウド案件に携わっています。
IoTシステムのバックエンド開発、Datadogを用いた監視開発など経験があります。
IT資格マニアでいろいろ取得しています。
AWS認定:SAP, DOP, SAA, DVA, SOA, CLF
Azure認定:AZ-104, AZ-300
ITIL Foundation
Oracle Master Bronze (DBA)
Oracle Master Silver (SQL)
Oracle Java Silver SE
■略歴
理系の大学院を卒業
IT企業に就職
AWSのシステム導入のプロジェクトを担当